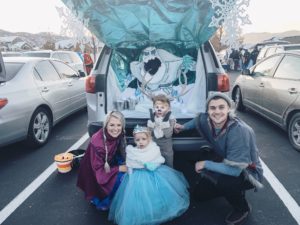
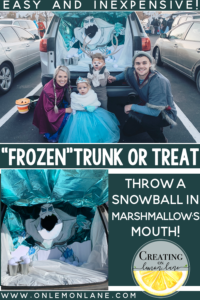
 I honestly could not have been happier with how our Frozen themed Trunk or Treat turned out this year. We weren’t planning on a community Trunk or Treat, but when the cold bore its teeth making it the coldest temperatures ever recorded in Utah history, some mommas put their heads together and came up with a solution. Growing up in a small town I’m typically a Trick or Treat Purist… However, add tiny kiddos and cold weather and no one will toot the Trunk or Treat horn louder. I love a trunk or treat that has a little surprise or activity associated with it, so I started to think of how I could incorporate a little fun into our Frozen theme.
If you’re looking for ideas and inspiration or DIY *ish Frozen costumes click here.
I started to think of the scene with Marshmallow and Anna, and she THROWS a snowball. That was it. My husband teased me as we left the trunk or treat that I would be disdained for going above and beyond. Couple of things. This was EASY. Anybody can do this, and do it on a budget. Lastly, I have to stress. I don’t do this for attention, I honestly LOVE this type of thing. This type of outlet. is. my. jam. It literally makes me SO happy to see it all come together.
Supplies:
- 2 Teal Table Cloths (I found these at Walmart in the Party Section, less than $3 each)
- 1 White Plastic Table Cloth (Walmart less that 1$)
- Small White Posterboard Trifold (28in x 40in)For the Body
- 1 Small White Posterboard (For the Head)
- Planting Pot (Approx 10 inch Diameter-For the Mouth I found mine in the gardening section at Walmart )
- Snowballs 3in ( These were worth every penny, we still break out into spontaneous Snow Ball Fights. Read the reviews I could have written every raving one) **This was the most expensive purchase for the trunk or treat. I could have made my own but was SO happy with this purchase instead. Anything I would have made would have fallen short to these “Crunchy, Magical, Realistic Snowballs.”
- Masking Tape
- Exact-O-Knife
- Hot Glue
Extras but not necessary
- Sparkly White Wrapping Paper (Used on the base of the trifold to cover my mess)
- Watercolors
- Small Snow Ball Buckets
- Snow Flakes to Hang from Car
- Black paper|Foam board| Felt… to line the mouth
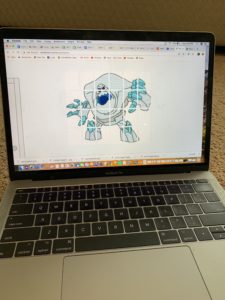
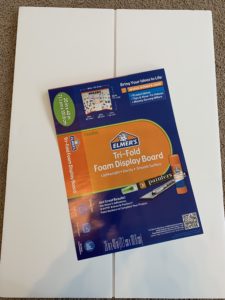 To begin, start with the tri-fold. Luckily I purchased the smaller 28 x 40 size. Any larger and it would not have fit in the trunk of my car. (GMC Acadia) Unfortunately, our printer was down so I had to freehand our little friend. If you plan to freehand, use an image to look off of, and grid both your guide and your trifold as a visual reference as you go.
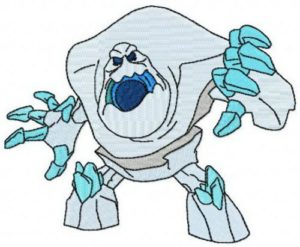
After looking at Marshmallow’s images, I liked this one best because the mouth was round and towards you. Rember the mouth is going to be a bucket, so this is perfect! If you know the original artist, I would LOVE to know and give credit!
Would you believe there’s even a video that breaks down how to draw this version of Marshmallow??? ***Just SKIP drawing the face you will do the face on a separate piece of foam board. (Body on the tri-fold, face on the separate poster board)
If our printer would have been working. I would have simply rasterized an image of snowball, printed out the pieces, put them together, and glued them on the poster board.
 Rasterize is just a schmancy word for dividing an image into multiple printer paper pieces. You put all the pieces together like a big “poster” puzzle, creating a larger image. This allows you to print larger images as opposed to fitting the single image on a single page.
To Rasterize the Snowball image click here. *Make sure to save the Snowball image to your device first!
By Rasterizing the image your proportions and details would be as easy as a coloring page in a coloring book!
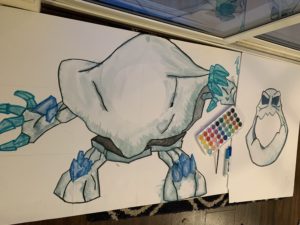
After sketching and erasing and erasing some more, I was finally left with a somewhat recognizable Marshmallow. You are going to sketch the body on the trifold and the head on the separate posterboard. Or simply print the head section twice, or cut it out of your printed poster, and adhere it to the separate board. While sketching everything out make sure to take into account the size of your bucket|pot’s opening. 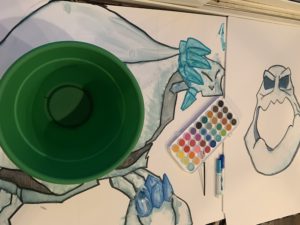 Once I have the body sketched I did a round outline of the pot’s opening on the body to estimate where the mouth/face would go and the proportions. After I traced opening again on the separate poster so I could begin to build the face around the opening of the mouth. I wanted some overlap on the mouth instead of a big gaping circle. The overlap will also give you more surface area to adhere the poster to the pot.
I then outlined the details using my children’s ultra-washable markers. It didn’t have enough dimension so I decided to mess around with their watercolors. This was a great choice. By simply adding water to those ultra washable markers, everything started to have a really cool effect! This was one of the most enjoyable moments of the project and made me consider actually learning how to watercolor. (I’m thinking oil is more my jam though. Precision is one of the furthest words from my character.)
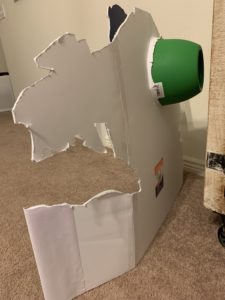 Now all that was left was to cut out the body, leaving much of the base|bottom to act as the foundation, as well as the head and the mouth’s opening. Once cut out I added the white sparkly wrapping paper to the bass by simply laying it over and due to its transparency, I was able to use an exact-O-knife to cut out the shape it would overlay on.
Next, *** I added a layer of masking tape to the back of the folds on the tri-fold to reinforce their strength and prevent any tearing. Make sure when you add the tape you do it when the folds are FOLDED.
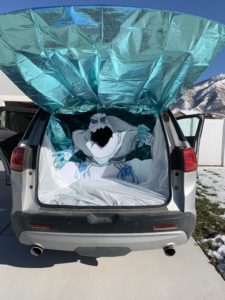
From that point, you simply need to attach the bucket|pot to the mouth. I did this with hot glue. Then you need to cut out the circle in the body where the mouth will be going. ***Start with a hole smaller than the bucket opening. I wanted it to fit tight. You can see in the picture I simply pressed the pot into the body. This allowed for a tight fit and I didn’t need to permanently attach the head to the body!
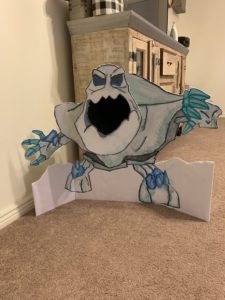
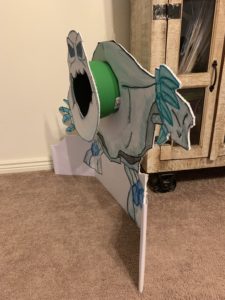
I then used black craft foam to line the mouth. I wanted it to look like a deep dark hole…and it did!
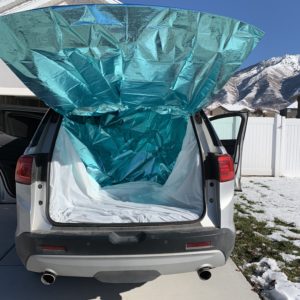
WaLa! You did it! Next, you move into the trunk space. This part was truly easy, peasy, lemon, squeezy! See what I did there ;D Honestly though you could whip this out in 3o minutes flat no problem. Simply start with your table cloth. I decided to work from the bottom up. So using the white table cloth I took each short edge of the rectangle piece and pressed it into the lining of my car. Using the edges of my car to guide my layout. Literally, all you are doing is tucking in the edges.
Click here for a quick video clarification
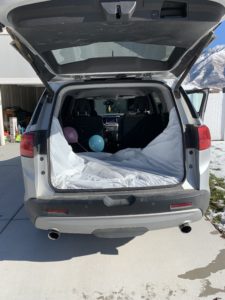
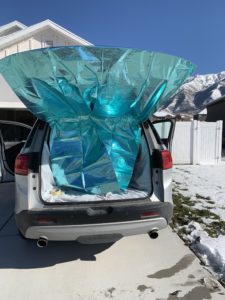
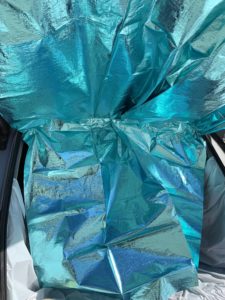
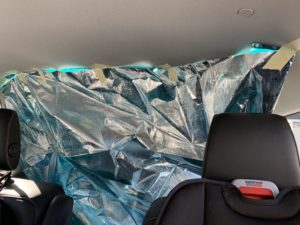
Next, I moved onto the blue section. The width of my trunk was almost exactly the width of the table cloth I used which simplified things! I simply used masking tape on the exterior of my trunk to attach the blue table cloth, then folded it under the trunk and tucked again into the upper lining. Next, I pulled it through the can to cover the ceiling and attached it to the ceiling using masking tape.
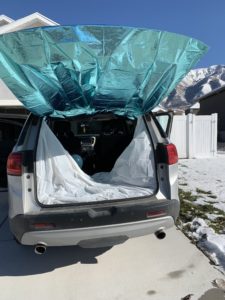
 I then took the second table cloth and starting from the trunk, wrapped it through the back of the car in order to block off the seats and create a seamless background.
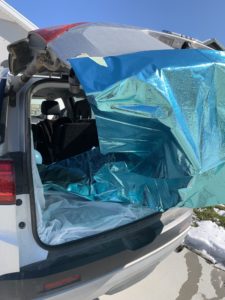
After that, I placed my little Marshmallow monster into the car and held him in place using my latest (heavy) grocery items from Costco. These items were in boxes which allowed me to create a support behind the monster. I also wrapped a heavy book in wrapping paper and placed it under the white table cloth, in front of the monster, to create support from the front as well. The last step and finishing touch were hanging the snowflakes from the sides and we were ready to roll!
My sister in law was nice enough to capture a quick video of the trunk in action! We gave over 400 pieces of Candy, Glow Sticks, and Glow in the Dark Snow Flakes… within 30 minutes! It was CRAZY. I loved having the little snowball buckets to hand to the kids. With the long line of kids, I only put two snowballs in each bucket. My job was simply to fill the buckets, run-down lost snowballs, and keep the line moving! If I were to do it again, I would consider blocking off the bottom of the car to prevent loose snowballs from rolling underneath.
To see my FAVORITE Halloween Candy Alternative Handouts, Click here.
What we handed out for our Frozen-themed Trunk or Treat:
You know the fun glow in the dark stars you attached to your ceiling as a kid?! YES. I wasn’t sure how these would be received but they were a hit! I ran out of these before I ran out of our aqua (Elsa Colored) Glow Sticks! PSA on the glow sticks… This brand came with the connectors ATTACHED. If you’ve done glow sticks before you know what a big deal this is! I won’t purchase another brand from here on out.
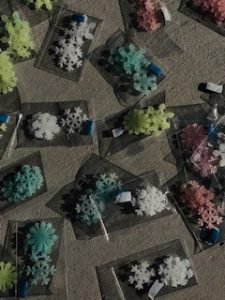
For our Frozen themed Halloween, we handed out Glow in the Dark Snowflakes! I stuffed 4-5 of these in a small self-sealing cellophane bag with a piece of tik-tak. I was skeptical that the effort wouldn’t be worth the reward… but I was pleasantly surprised. We were able to knock-out these fun little handouts in NO-TIME. All were assembled within 15 minutes! I’ll link the exact products we used, that were extremely cost-effective and SO fun. Don’t mind my terrible picture. I was letting these “Charge” before our Trunk or Treat and this was the only picture I was able to snag in the rush of things!
- 2 x 3 in Cellophane bags (These were the PERFECT size! If you do larger stars or shapes make sure to size up!)
- 200 Glow in the Dark Snow Flakes (These came separated by colors)
- Mounting Putty (I cut out the tabs individually with scissors, this was a breeze and worked perfectly!)
- Aqua Glow Stick Bracelets with Connectors ATTACHED.