I’ve always enjoyed Halloween… but Halloween with little ones is a whole new level. My parents began throwing a Halloween party for everyone a few years ago and it quickly became one of my favorite traditions of the year… If you don’t have a Halloween party tradition of some sort… START ONE. It can be meeting up with friends for games and snacks before heading out to trick or treat or a full-on party like this one sometime during the month of October. Either way, it’s times like these where the memories are made! More on the party later. One day I’ll have my momma and creative genius get on here to explain all the fun parties she plans. She. is. the. best. So extremely grateful for parents that do everything in their power to foster quality time together and wonderful memories.
Award-Winning Costumes:
Little dude is bugling because that’s what Caribous do.
I should start this post off by saying these costumes are award-winning costumes. *Disclaimer: These award-winning costumes were decided by a sibling vote. Siblings that were very much aware of my sad and desperate desire to get my name on the annual Halloween Costume Trophy… That being said there is a trophy, so claiming award-winning is completely valid and not the least bit misleading.
 I don’t know what it is but I always have such a strong instinct to create some portion DIY in our Halloween Costumes. I say instinct because it’s certainly not a desire, it is literally a need within me. I tell myself I’m saving money by going the do it yourself route… However, my craft store receipts tell a different story. Not to mention by the time you. put. in. the. time. It is close to ridiculous. I’m not bitter. Come next year, I’ll be chomping at the bit ready to put a DIY spin on a costume.
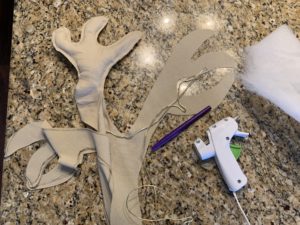
To be fair, I had a TERRIBLE time trying to make Caribou antlers for the boy. I’m talking 6 hours on ONE SIDE, only to realize once finished it became a floppy disaster way to heavy to be anything except a doorstop type of experience. Little boy’s store-bought antlers were the best money I’ve ever spent.
Everything else went great and for the most part, was affordable. I’ll share those with you and the rest of our costume details below!
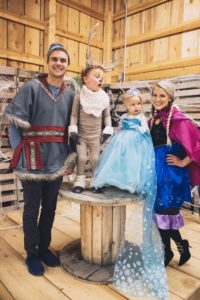
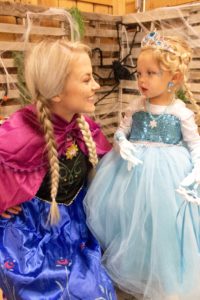
ELSA
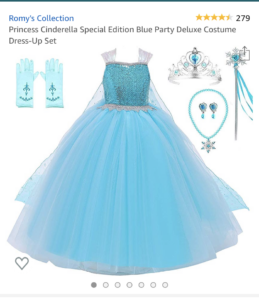 We were originally going to dress up as Toy Story this year and had some fun ideas we were excited about. However, as Halloween got closer I could not bring myself to put my princess-loving girl in anything other than a big, poofy, cupcake, princess dress. Thus the need for a princess that had an animal in the storyline. Preferably an animal with antlers or baby boy would have nothing to do with it. It certainly helped that Frozen was a favorite in our household. So, little Lou was set to be Elsa, I just needed to find that big poofy Elsa Dress. There are a lot of Elsa Dress options out there, but when I found this one… it was the Elsa dress of my dreams. Plus when you consider everything that comes with it, it felt like a no brainer.
 The only downside for me was the short sleeves. We are in Utah and this year Utah bore her teeth early with the lowest temps in October EVER recorded. The cold may not have bothered THEE Elsa, but it does bother me. So the need for sleeves and an extra layer of warmth were needed! I finally thought of a leotard and after trying a few out we found the perfect one!
Because of how tiny little Lou is, I had to take the dress in, as well as bring it up a couple of inches. I also wanted to add a little oomph under the skirt to prevent it from wrapping around her feet. I was able to find the perfect little hoop skirt! This along with a petticoat gave it a great poof!
Click here to purchase the Baby Hoop Skirt
Click here to purchase the Petti Coat
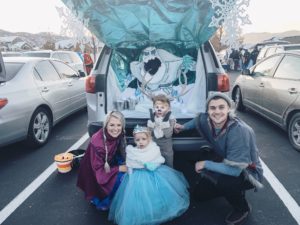
We completed the look with gemstones, and a couple of my old extensions from the time before my hair started to grow like a weed. Notice her Elsa braid… or what she would call, her dolly hair. We also got a fur wrap to wear around when we went Trunk or Treating! See the image below or click here to see our Frozen themed Trunk-or-Treat.
ANNA
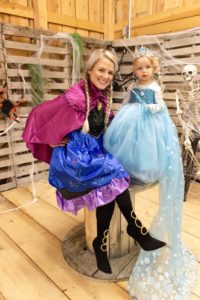 I couldn’t bring myself to spend mega-mooga bucks on a costume I would wear once, and I had every intention of making my cape… While searching I came across a costume on sale for TEN DOLLARS. the only problem… It was meant for a 7-8 year old girl. No risk, no reward. Now by no means did this outfit fit me. It was more comical than anything. In fact, when I was showing Ben my options I told him I was worried it was too short, or could give the wrong impression. He too quickly assured me I was nowhere near giving that impression… Thanks? I think?
I bought the fabric and embellishment to make the cape but was so burnt out after the floppy horn ordeal, that when I found this Anna Cape at Claire’s at the Mall… it was a no-brainer.
THE coolest part of the Anna costume was the BOOTS, better yet… Faux boots. That’s right, those cute black boots were made possible with black SOCKS, a little gold rope, a hot glue gun, and some heels. I had watched a video where someone exposed this nifty little trick and couldn’t wait to try it to add the finishing touches to my Anna costume!
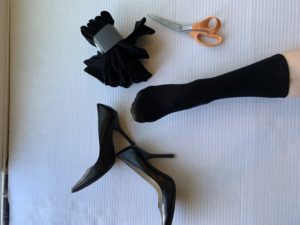
 I’m very visual so many of my projects or costumes start out as a drawing or sketch. Clearly the sketch is identical to the end result…. 😀 To create these boots simply put on the sock, make a small hole at the heel, approximately where the shoe’s heel is. Next, take off the sock and replace it with the heel. Slide the sock over your shoe placing the feel through the hole in at the heel in the sock. WA-LA. To add embellishments I plugged in the hot glue gun, slipped the sock on, and placed a barrier where I would be gluing under the sock to protect me from the high temperatures. I used a thick post-it note stack. It worked great because it curved along my foot. All that was left was to glue the rope directly on to the sock, let dry, and THERE.YOU.GO.
SVEN
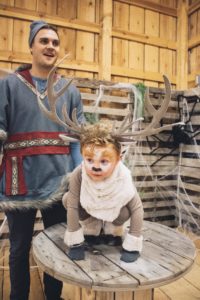 Though I will never attempt to make caribou horns again… The Sven costume was one of my FAVORITES. Benson Boy is so funny. Once he was all in costume, face and all… He posed the question to himself, “Do I look good?” He then strutted to the mirror, stared at himself with raised eyebrow, and replied to himself a very firm, “Good.” He spent the rest of the time running and bellowing as one might expect a caribou or reindeer to do.
His costume was very simple, just a nice soft pair of pajamas that he can wear and re-wear after Halloween. Always a big selling point for me.
Click here to purchase the Pajamas
A pair of store-bought Sven Antlers, again the best money I’ve ever spent after my 6-hour escapade.
Click here to purchase the Sven Antlers
Some mittens, face-paint, and fur from the craft store. I only needed 1/3 of a yard and still had plenty leftover. Be warned working with faux fur is not for the faint of heart. It is terrible and each loose hair will enter your nostrils and stick to every part of you. Have a lint roller, and a vacuum handy and whatever you do… DO NOT cut the fabric in your house. To create the pieces I simply made as few as cuts as possible and then used hot glue to create bends and folds in the neck fabric. The neck fabric wraps around and attaches by using velcro, which again was simply glued on by a hot glue gun. Same with the foot and handcuffs.
CHRISTOPH
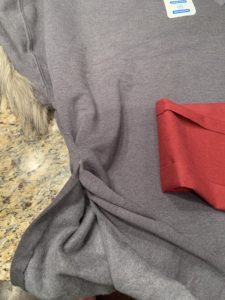
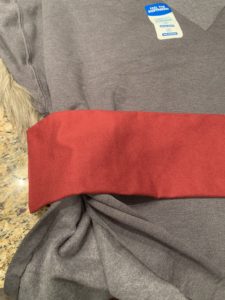
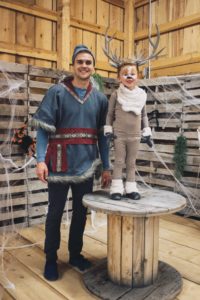 This one was truly a DIY costume in every aspect of the word. Simple, easy, you just need your embellishments, a 7$ Sweatshirt from Walmart, and a glue gun. If your husband is anything like mine, the simpler the costume… the better. This one literally allows him to wear his regular clothes, just slip the sweatshirt tunic over the top, and throw on the beanie… except that’s not actually a beanie… It’s one of the sleeves from the sweatshirt rolled down and cuffed! If you have a beanie, you might consider using the cut off sleeves as fake boots!
I’ve seen similar tutorials that use a T-shirt. I prefer the sweatshirt. Warmth for one, extremely inexpensive, and it gives you a little more structure. Similar to the look of the actual character.
- To create this look simply buy a couple sizes too large sweatshirt.
- Cut off the sleeves, leaving a little cuff below the shoulder.
- Cut a V Neck
- Cut slits midway up the sweater
- Make a slight cut out above the leg
- Glue the sides to a more fitted wear
- Glue on embellishments.
- 1 Yard of ribbon, 1 yard of Burgandy felt, 3 yards of fur trim.
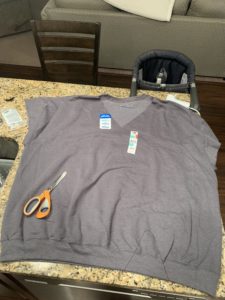
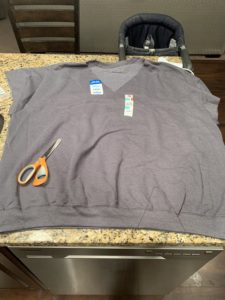
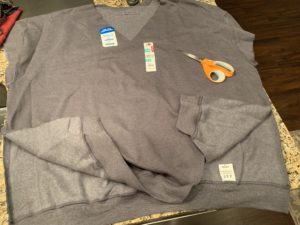
I made the mistake of purchasing expensive fur trim. The trim literally cost more than the costume itself. Though it was convenient do not make the same mistake that I did. At Joann’s, I purchased the trim that needs to be cut for you. Don’t do it, unless you want to… Instead, look for this fur. At my local store, it was near the feather and leather section! Once you have your embellishments get gluing!
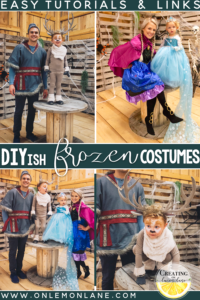
This was a Halloween to remember and I’m thinking will be a favorite of mine for years to come. If you’re interested in Frozen Family Halloween costumes, make sure to check out our Frozen Themed Trunk or Treat! IT turned out better than I could have imagined and the frozen themed handouts were an absolute hit!
To see the tutorial for the trunk of treat, click here!
To see the list of my favorite non-candy Halloween Handouts click here!