This has been an activity that’s consumed my thoughts for a while. Typically, the more something consumes my mind the more excited I am about it. I was on the search for a fun Easter Activity appropriate for Upper-Grades. It wasn’t until I stumbled across Pysanky: Ukrainian Easter Eggs, that I knew I had found it. The anticipation for the final reveal ignites engagement, the process requires higher-order thinking, and the end product is completely beautiful. This process allows students to keep and treasure their pysanka for years to come.
 In my mind, this project is for 10-year-olds and up, however, 3rd graders continue to surprise me! If you teach 3rd grade and have success with this project in your classroom please let me know! If you teach high-school, please consider introducing your students to the actual tools, and crafts of pysanka. I had to try it for myself and was immediately enveloped by my fascination for the craft. I told my husband that this was my new therapy, a better word would have been my new obsession.
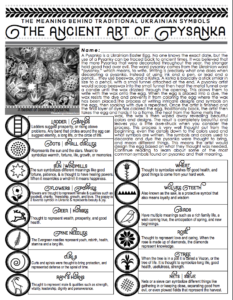
Pysanka has been around for thousands of years. Pysanka comes from the Ukrainian word, “pysaty” which means, to write. Painting an egg and writing on an egg are two completely separate things. In Pysanky, a tool known as a kistka is used. Think of it as a stick with a small metal funnel at the end of it. The funnel is used to scoop up beeswax, then melt it over a flame. Once the temperature is right the wax drizzles through the funnel, allowing the user to draw with wax on the easter egg. Intricate designs can be created by alternating layers of wax and dye. Traditionally, only the colors white, yellow, red and black were used. Later, green dye was also introduced. Once the design is achieved the wax is melted off using the candle’s flame. As you remove the wax the different layers of colors once protected by the wax show through.
I set out to come up with a classroom-friendly, no flame necessary, pysanka copycat for kids. Like many, I had experimented with crayons and egg dye in the past, but I had never considered melting the wax off the egg. This ended up taking a few trials and errors to perfect, but I am so excited to say that I present this process to you with full confidence.
 Let’s get started! Before we can begin you need to order supplies for your students. Like craftivites in the past, I take into consideration the cost it takes to outfit your entire class with what they need. I know this is likely coming from your own pocket, which means I strive to bring the most cost-effective and engaging ideas to you!
Supplies:
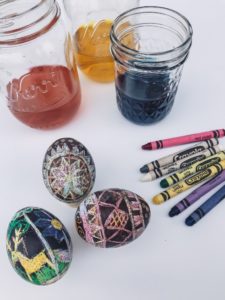
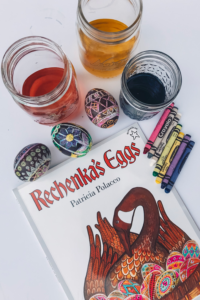
Egg Dye: Traditional Pysanka Egg Dye is beautiful and toxic. A simple food-safe dye will give you a similar effect. If you are nervous about artificial dyes or have a student sensitive to specific food dyes, I’ve also included a more natural option below. I would highly recommend purchasing the black food dye as well, not only is it a traditional pysanky color, but the contrast is really stunning. To make the dye simply mix 1/2 cup of water with 1 TBSP of vinegar and 20-25 drops of the desired color.
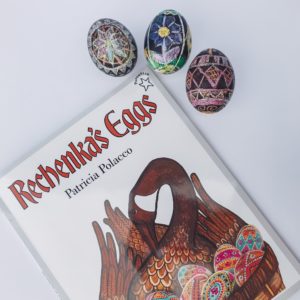
Picture Book: Not necessary, but who doesn’t love Patricia Polacco. This is a really sweet book about a Babuska that paints and decorates award-winning eggs. One day an unruly guest may stand in the way of her prize. A friendship blooms and miracles are witnessed. This really is a perfect read-aloud to tie in to this activity. Students can also seek out inspiration from Polacco’s illustrations for their own designs!


- Set of 15 Egg Stands
- Wooden Egg Stand 20 count *Budget Friendly

- Jumbo Push Pins If you don’t already have a pack of jumbo push pins in your classroom, I highly suggest purchasing a pack. They are the perfect size to allow you to get a better grip and handle on what you’re doing. I use these for the String Art Christmas Ornaments as well. However, I was able to have success poking a hole in the egg with both regular thumbtacks and a regular push pin as well!
- Masking tape or Painter’s Tape: You will secure a piece on both the top and bottom of the egg when piercing it. The tape gives the pin a better grip as well as secures the egg to prevent it from cracking.
- White Vinegar: Allows the dye to better adhere to the egg’s shell. We’re talking CHEMICAL REACTION.
- Coarse Screws: You will use these to make the larger hole in the bottom of the egg if blowing them out. It took a little trial and error before my husband suggested a screw. He’s a gem, and these worked like a gem. Honest to goodness foolproof way for emptying an egg.
Eggs: (Raw) Make sure you give them a nice little rinse and scrub before dying them. If they are from the grocery store a lot of times they are sprayed with a wax-like substance that can affect the dying process. If you have a student with an egg allergy. Try these Dyeable artificial eggs. They work, they don’t work well, but they work. Make sure to allow adequate time for the color to set in. (they are $$$ on Amazon, Target is your best bet :D)
- Syringe Pack: When blowing out an egg you’re supposed to use your mouth…No thanks. THESE WORKED BEAUTIFULLY. Honestly, better than I imagined they would.


 (Recommended for Upper Grades)
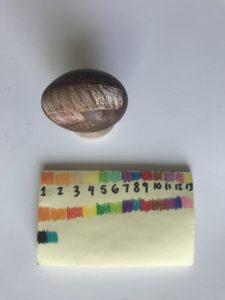
 Regular Crayons 2 Pack 64 Count: Regular crayons are going to be your best bet to get the best coverage, better wax resistance, and most contrast with your colors. Interestingly enough not all the crayons are created equally when it comes to this project. I found that your reds, purples, and blues perform the best. See my visual in the process below. Keep in mind these crayons require more heat in order to be wiped away. This can easily and safely be done with a blow dryer. From my little science experiment if you plan to let the eggs soak or want better coverage regular crayons are your best bet. Red, blues, purples seemed to perform the best.
- (Recommended for younger grades)Washable Crayola Crayons: I know it seems so wrong to purchase crayons when you are surrounded by broken remnants everywhere in your classroom. These worked really well because of their “lavability”, melting point. These released and wiped clean easier than the regular crayons did. However, some colors worked better than others. I’d avoid purple, it went on very smooth but didn’t adhere to the egg like I wanted it to. You also want your egg dry before adding more designs with your crayon. These crayons will work better for younger grades because the wax doesn’t need to reach as high as temperature to be removed. The only caveat is that these crayons are designed to be washable with warm water. This means if you plan to soak your eggs for a long period of time, you risk the crayon simply washing off. The bonus is that if you are nervous about using heat or a blow dryer to remove the wax you could technically just wash it off with warm water to get a similar effect.
- Class Set Crayon Sharpeners: Not necessary but a good idea for students wanting to achieve a more fine and delicate design.
If you’re like me, then you are itching to get your hands on an actual Kistka and try your hand at some genuine Pysanky. Below is the kit I purchased and it was perfect! I am legitimately planning a Pyskany Party for friends and family to try their hand at this ancient craft!

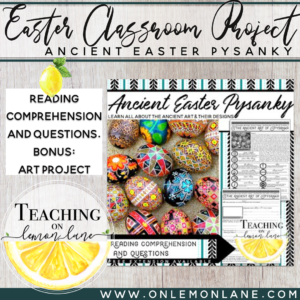
Don’t forget to download this fun reading comprehension activity! This is a great introduction to Pysanka. In this fun reading comprehension, students will learn about the fascinating history behind the process, what the process entails, and the meaning behind some of the most common symbols used. Students will answer questions based on the reading.
I’ve also created a FUN and FREE activity to accompany the reading comprehension! The answers can be found within the reading comprehension passage! You can purchase the passage above. This download is exclusive to members of On Lemon Lane. In order to access the download, you must be logged in. Not a member? Not a problem! Sign-up is FAST, FREE and Easy-Peasy Lemon Squeezy! Click here to become a member!
Click Here to Download the FREE Crack the Code Activity
Stay tuned! More Fun Products to Accompany This Activity Coming Soon!
- Pysanky Terminology and History: Reading Comprehension Questions, and Crossword Puzzles.
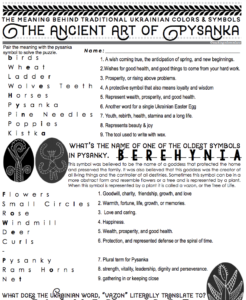
- Pysanka Symbols, Colors, and their meaning.
- Design your own Pysanka: Methodical planning, design, process, color mixing.
- Scientific Observation: Chemical or Physical Change Checklist
Pysanka in the Classroom: Tutorial
Traditionally, when creating pysanka if you plan to blow the eggs, you often begin with an egg that has been blown, then use the melted wax to cover the holes. Because we are using crayons, this is not an option. The following is a tutorial I created with students and a classroom environment in mind.
- Begin by gently rising your eggs with light dish soap to remove any dirt or wax coating.
- You may want to map out your design using a pencil before beginning.
- It can also be helpful to divide your egg into different sections using your pencil, consider vertical or horizontal stripes on your egg to help guide your design.
- When working with pysanka, it’s helpful to have your end goal in mind as you begin. Often you will have to work backward as you consider which order you will dye your egg, and what designs must be covered in their wax barrier in order to achieve the desired look!
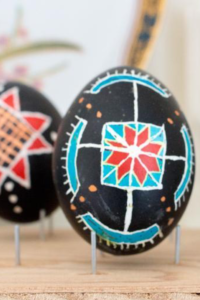
- Grab a crayon and begin your design. Remember the color of your crayon doesn’t necessarily matter. It is simply providing a protective wax coating from the dye. Anything you cover with crayon at this point will show through as the egg’s color once you melt the wax off. ***Consider purchasing the Reading Passage, the passage includes an introduction to some of the most popular designs used in pysanka, their examples, and their meanings!
Click Here to Purchase the Reading Comprehension
- Once you’ve completed your first pass of crayon wax, (everything you want to show through as the egg’s color (White) you will then soak your egg in the first egg dye. ****Always start with your lighter colors of dye, you will build on your dye.
- Typically yellow is the first color you will dye your egg. Place your egg in the dye and let it soak. The longer you let your egg soak the more rich the color will be.
- Once the color is to your liking, remove the egg and pat dry. Be especially careful if you are using super washable crayons. The soaking alone will pull the wax from the eggs. Regular crayons are your best bet. I only suggest ultra washable crayons for your younger grades to make wax removal easier.
- Now that your egg is dry, grab your same crayon and do a second pass of crayon wax layer. This time you are covering your egg in wax anywhere you want the NOW colored egg to show through. So if I were doing a flower, and I had just dyed my egg yellow, I may use the crayon to cover the center of the flower. That way when I melt the wax off, the yellow center will show through.
- Consider which dye colors you have and which color you would like next. If I just used Yellow, I may place my egg in blue dye briefly next to get a green layer of dye.
- Continue using your crayon to create a barrier of wax between the egg and the dye, then placing the egg in the next desired die color.
- Once your design is complete, place the egg in the final color. This is where I like to use the traditional black dye. I also like to let the egg soak overnight to have a high-contrast with the layered colors protected beneath the crayon wax layer.
- Once the desired color is reached, remove your egg and pat dry, removing any excess water or dye.
- Next is where the magic happens!
- Grab a blow dryer and on low heat, careful not to burn any fingers, direct the heat at the layers of crayon wax on your egg. Wipe away the wax delicately using a paper towel, careful not to break your egg!
- Continue this process until no crayon wax remains, and your design is revealed!
- Now you need to “Blow Out” your egg.
- In order to blow out your egg, you will need a small hole on both the top and bottom of the egg.
- Be very careful, and cautious during the next steps! There is nothing more heartbreaking to get to this point only end up with a broken egg!
- Place a piece of masking tape at both the top and bottom of the egg. **See video for clarification. The tape will help to reinforce and stabilize your pressure as you pierce the egg. It also gives you a little more grip on the slippery eggs!
- Next, take the pushpin and carefully use the pushpin to get your hole started. Once the push pin can fit through you will then use the coarse screw to make the hole a little larger.
- Using the coarse screw, very carefully and VERY slowly, begin to drill a slightly larger hole into your egg by twisting the screw back and forth.
- The top hole does not need to be very big, this is where the air will be passing through. I make the top hole big enough so an unfolded paper clip can fit through it. (I use the unfolded paper clip to “scramble” the yolk before blowing it out.
- The bottom hole will need to be slightly bigger, this is where the yolk will pass through.
- Once your top hole is finished, use the unfolded paperclip ***Only the straight part, any bend in the paperclip may cause a break in the egg. Use the straight part to stir around the insides breaking up the yolk.
- Another great option, as opposed to the paper clip, would be a TOOTHPICK or a Nail.
- Follow the same process as above to now make a hole in the bottom part of the egg. This hole will need to be slightly larger, once the screw can go through it.
- Now use the baby nasal aspirator to create a seal around the top hole. Hold the egg over a bowl, or garbage… Using slight but constant pressure, begin to press air into the egg, causing the yolk and whites to drain out the bottom hole.
- ***Anytime there seems to be resistance to the draining, DO NOT ADD MORE AIR, instead pause, and use the toothpick, nail, or straightened toothpick to again “scramble” the insides.
- Continue this process until the egg is completely drained.
- Once your egg is drained use a paper towel to dry the egg. Then make sure to wash your hands. Continue to let the egg dry and air out. Once dry you can attach the egg to an egg stand using glue!
If you do this activity PLEASE PLEASE PLEASE tag me, I would LOVE to hear how it went, any tips you have, and especially what your students thought!
For some Pysanky Inspiration make sure to check out a few of my favorite Pysanky Artists/Writers on Instagram!
@Sweetbing
@jenniferekwong
To stay up-to-date on new blog posts, freebies, exclusive promo codes, and sales… Join the Teaching on Lemon Lane Community! Pick any or all of the following to stay in the loop of all things Teaching on Lemon Lane.
- Follow @TeachingonlemonLane on Instagram
- Like Teaching on Lemon Lane on Facebook
- Join our exclusive Teaching on Lemon Lane Facebook Group
- Sign-Up for our Monthly Newsletter: No Spam, only make your life easy-peasy, lemon-squeezy goodness… Promise.
If you enjoyed this PLEASE SHARE! Sharing on Pinterest, Facebook, or tagging on Instagram is a simple, yet wonderful way to support the efforts of Teaching on Lemon Lane!